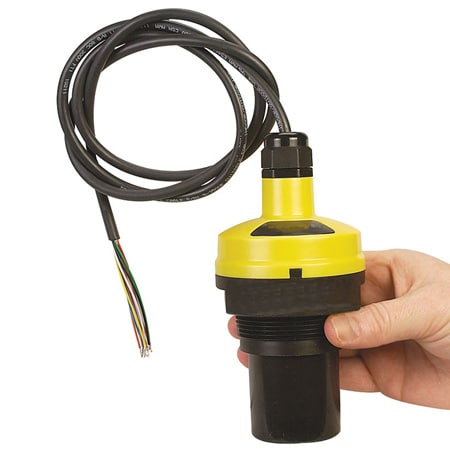
Cooling towers are heat exchange systems that bring air and water into direct contact with each other in order to reduce the temperature of the water. To accomplish this, water is continuously pumped to the top of the tower, where it cascades over a series of baffles, mixes with air, and collects in either a basin located directly under the tower or a sump next to the tower. As heat and water escape the tower through evaporation, additional water must be periodically added to the system. Cooling towers come in a variety of sizes from rooftop systems to those the size of buildings or even larger. The typical water basin is open to the air, 4' or less in depth, constructed of fiberglass, metal or concrete, and large enough in capacity to hold all of the water in the system. Cooling towers have two basic control systems, one to add liquid into the basin, and one to turn the water recirculation system on or off. The primary requirement for this application is to monitor the liquid level, automatically refill the basin, and prevent the system from running dry.
Technology
A short duration, high-frequency ultrasonic sound wave is pulsed up to four times per second from the face of the transducer. The sound wave reflects off the surface of the liquid and returns to the transducer. The level sensor measures the time of flight between the sound generation and receipt, and translates this into the distance between the transducer face and liquid surface. The distance is then converted into a percentage of measured span and output as a proportional 4-20 mA signal.
Best Practices
Cooling towers are located outdoors with no environmental protection. They also have a steady flow of water raining down within them, which depending upon the level sensor’s location and type of installation, may result in the formation of water droplets or ice on the transducer that can affect acoustic transmission and receipt. Select a level sensor with an appropriate weatherproof enclosure rating and longer, more powerful measurement range. Then apply a very thin layer of petroleum jelly water repellant across the transducer face. The installed level sensor must have a clear view of the liquid surface. This means that the measurement space beneath the level sensor should be free of any obstructions such as pipes, fittings or walls inside the basin. The installed level sensor must be located above the highest liquid level so that it would never be submersed during normal operation, and if possible, away from directly falling water.
Installation
There are two primary ways to mount a level sensor in this application. The preferred method is with a stand-pipe, as it dampens out surface agitation and separates the transducer from falling water. The second is with a mounting bracket attached to the side wall or an aperture extended over the basin. Find a mounting location where the level sensor has a direct view of the liquid throughout the entire measurement span. The location must be flat, perpendicular to the liquid and accessible. The following equipment can be used to install the sensor.
Stand-Pipe
Level sensors can be installed in a stand-pipe to separate surface foam, dampen turbulence or maximize the acoustic signal strength of the level sensor. The stand-pipe must be one continuous section of smooth pipe without any breaks or transitions. The pipe’s inner diameter must be equal to or greater than the level sensors beam width and larger diameter pipes are recommended. To install the level sensor, mount a low-profile threaded coupling on top of the pipe. Just under the coupling, and within the level sensors deadband, drill two quarter-inch vent holes on opposing sides of the pipe. The pipe should extend to the bottom of the tank, or at least below the level sensor’s measurement span. Cut a 45º angle on the bottom of the pipe. Finally, the level should be maintained above the 45º cut, so there’s always liquid in the pipe.
Side-Mount Bracket
The side mount bracket can be used to install the level sensor against the side wall of the basin or an aperture extended over the basin.
Tank Adapter
Tank adapters are recommended where the tank’s mounting location is level and not on a slope. Use a tank adapter that is slip x thread, and avoid thread x thread adapters. Do not use tank adapters that are mounted upside down.
Coupling
A shorter half coupling is preferred over a taller full coupling. Use a coupling that is slip x thread, and avoid thread x thread couplings.
Electrical
Cooling towers often have large pumps, motors or variable frequency drives that can generate substantial EMI or RFI noise. Make sure that such devices are grounded to earth, and then ground the level sensor and associated electrical equipment to the same earth-ground as these devices. Some areas may be subject to frequent lightning strikes or have unreliable power. Where so, proper surge protection and filtering is recommended.
Span
The level sensor outputs a 4-20 mA current signal that’s proportionate to the measurement span within the cooling tower basin. Users typically set the 4 mA to empty or the lowest measured level, and 20 mA to full or the highest measured level. Avoid placing the 4 mA or 20 mA span setpoints at or near levels where pumps, valves or alarms may actuate.
Interface
The level sensors 4-20 mA current signal is normally connected to a local controller or centralized control system. These devices may include a PLC, SCADA, DSC or stand-alone level controller. Either control device is fine as long as it accepts a 4-20 mA current signal. The operational range of the controller must then be programmed to match the measurement span of the level sensor, and take into account that the sensors 4 mA setpoint is normally placed above the empty tank condition. Once the controller's operational range has been configured to the correct levels and engineering units, then the relay setpoints are applied for pump, valve or alarm automation. Remember, the primary control for this application involves the filling of the basin before it empties due to evaporation, thus avoiding shutting down the process due to lack of water supply. This is typically done with a valve. The fill process should start at a low-level valve open setpoint and stop at a high-level valve closed setpoint. A low-level alarm or shut-off setpoint should be placed under the valve open setpoint. An independent high-level alarm or safety shut-off system should always be used in addition to the primary system, and an independent low-level alarm or safety shut-off system is recommended for process protection.
This material has been republished with permission from Flowline, Inc.


